Adding a custom favicon to your blogdown theme
By Tom Franklin, 27th July 2018
I’m a big fan of blogdown. It’s tricky to set up in the first place getting a theme right and deploying it (with the help of Amber Thomas’s fantastic blog), but I’m really impresed with how flexible it is.
With my new blogdown, I decided I wanted to change the default icon that appears on your browser tab (which I later found out is called a favicon), but couldn’t find any guidence on how to do this with blogdown. Lot’s of googling and HTML nightmares later, here’s what I found.
1. Find an image you’d like to have as your favicon
Now go to a website that can turn your image into the favico.ico format. I used the favicon-generator and for this blog post, I’ve just used an MIT licensed logo found here on pixabay.

Now move this file over to this part of your folder structure and save:
your_blog_name/static/img
2. Now to change your HTML
In my theme, I went to the folder and opened up the head.html file in the folder structure:
your_blog_name/themes/your_theme_name/layouts/partials
Open up this folder to edit, and add this line of code to your blog
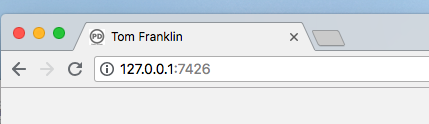
<link rel="icon" href="{{ "img/favicon.ico" | absURL }}" type="image/x-icon">Save this and then run blogdown::build_site() and your new favicon should be on your browser tab like so! Disclaimer: it may take a minute or so to decide to work, keep building the site a few more times if it’s being stubborn!
Happy blogging!